

Building with Mojo (Part 5): Modules and Packages
Organizing code, building packages, and managing dependencies with Pixi

This article is Part 5 of our ongoing series on the Mojo programming language. Part 1 introduced Mojo’s origins, design goals, and its promise to unify Pythonic ergonomics with systems-level performance.
Part 2 covered Mojo’s SIMD-first model in practice.
Part 3 covered converting a Python program to Mojo, and exploring how they interact.
Part 4 covered compile-time metaprogramming in Mojo


This article covers
A review of Mojo’s standard library.
Creating and importing modules.
Importing a package from source or compiled.
Importing external Mojo packages with Pixi.
Our code examples until now were intentionally small, so we almost never needed more than one .mojo file for the source code. When a software project grows bigger, however, it is natural to group related code together in one or more files—for example: helper functions, or data-related structures and methods, and so on.
When this project is meant to execute on its own, it is common to have a main.mojo file as an entry point to the app and as a kind of central hub to oversee the execution. But you can also have code that is only meant to be reused by other projects. These projects typically include APIs (structs with their methods and helper functions) to be imported and used in other Mojo programs, as a library.
This modular design not only helps to structure a project and organize its code, it also promotes code reuse. A similar concept exists in almost all programming languages, with slightly different rules and functionality, and diverging names such as package (Java, Go), assembly (C#, .NET), library, or module. This last name is also adopted in Mojo and Modular software. Mojo also uses the term package as a group of related modules.
Moreover, we want our application to be able to import functionality from other modules, namely from the stdlib, other local Mojo modules, or external Mojo modules written by other people or companies.
We’ve already seen how to import and use local Python modules or external Python packages like numpy in one of the previous articles.
In this article, we’ll discuss how to make and use modules to structure code. This system is quite simple and works a lot like Python. We’ll give an overview of Mojo’s stdlib and see how to import local code and external modules. We’ll also see how Mojo’s packaging system works, compiling module code into binary packages, which can then be imported into our projects.
Finally, we discuss the role of Pixi as Mojo’s package manager.
But we’ll start with what we know already: how to import functionality from the stdlib.
To follow along, use Pixi to create a project called modules_and_packages and cd into it. All code examples used in this article can be found in the code repo here.
Using Mojo’s standard library
Importing functionality from the standard library (stdlib) is so common that we’ve already done it tens of times. For example:
from collections import List
from python import Python, PythonObject
from random import seed, random_ui64
from sys import argv, exit
from testing import assert_equal
Let’s now get an overview of the stdlib.
The standard library is batteries included: it tries to provide everything you need as general functionality in Mojo programming. At the time of writing, it contains some 28 packages (and many more submodules), ranging from algorithm to utils. It implements basic data types like Float32 and SIMD, collection types like List and Dict, reusable functions and algorithms, and modules for GPU programming. Their number and contents still grow quite often, but a good starting point is the overview you can find here.
The Mojo stdlib is organized in packages, each package grouping one or more related modules, for example:
The
algorithmpackage groups thefunctional,memory, andreductionmodules.The
memorypackage contains as important submodulesmemory,span,arc,owner_pointer,pointer, andunsafe_pointer.
Modular has open-sourced the code of the complete Mojo standard library. Here are the current packages and what they contain or implement (you can look at their source code here):
algorithm: higher-order functions and SIMD reduction.base64: functions for base64 encoding strings.benchmark: used for runtime benchmarking.bit: functions for bit manipulations.buffer: utilities for buffers andDimList.builtin: implements core types, traits, and functions, such asInt,Bool,abs,min,max, and many others. It is a comprehensive package of core language features. Not everything inbuiltinis automatically available in every Mojo program. You may need to explicitly import what you use.collections: thestringpackage, and modules forList,Dict,Set, and so on.compile: utilities for compiling and inspecting Mojo code at runtime.complex: types and functions for working with complex numbers.gpu: low-level programming constructs for working with GPUs.hashlib: various hashing algorithms.json: a high-performance JSON parser.logger: logging functionality.math: mathematical constants and utilities.memory: memory utilities, pointer types, and theSpantype.os: operating-system dependent utilities.pathlib: containsPathand related functions.pwd: access to user and group information from the password database.python: using Python within Mojo.random: functions for generating random numbers.runtime: the runtime package.stat: aliases and functions for modes like devices, files, sockets, and symlinks.subprocess: for running a command.sys: interactions with execution and system environment, foreign function interface (FFI), host target info, and intrinsics.tempfile: temporary file functionality.testing: testing functionality.time: basic utilities for working with time.utils: numerics functionality,IndexList,StaticTuple,Variant,Writer,Writable.
If you look up the memory package, for example, you’ll see that a package is just a collection of Mojo source files (modules) in a directory that includes an __init__.mojo file, which can be empty.
By organizing modules together in a directory, you can then import all the modules together or individually. The directory name works as the package name when importing the package.
The prelude is a special module that enumerates a set of entities (types, aliases, functions, from builtin and elsewhere) that are automatically available in every Mojo program. You can find them here.
Now we’ll analyze the import syntax, which not only works for the stdlib, but also for local and external Mojo modules.
The import syntax
You probably noticed that module and package names are written in all lowercase, like in Python. To import functionality (data structures or functions), for example from the memory package, use the following code (see import_syntax.mojo):
from memory import memset, memcpy, UnsafePointerThis enables us to use the functions memset and memcpy, or the struct UnsafePointer directly, without having to qualify it with memory:
var lst = List[Int](1, 2, 3)
_ = UnsafePointer(to=lst)
If you look a bit closer, you might notice something strange. The memset and memcpy functions are defined in a memory submodule of the memory package. Shouldn’t we import them as:
from memory.memory import memset, memcpyThis works also, but the shorter version from memory import memset, memcpy works because the __init__.mojo file that is also read in when importing memory contains the line:
from .memory import memcmp, memcpy, memset, memset_zero, stack_allocation(.memory refers to the submodule memory in the current folder.)
The __init__.mojo file in a package re-exports, as it were, the contents of the submodules to the package level. (Now explain why we don’t need to write from memory.unsafe_pointer import UnsafePointer.)
If you want explicitly to import from a submodule, write:
from max.engine import InferenceSessionTo avoid name-clashes, or simply to shorten the name, you can use as to define an alias for the thing you are importing, for example:
from memory import UnsafePointer as UPtYou can then use it in code as:
_ = UPt(to=lst)The general syntax is:
from package1 import function1, Struct1or:
from package1.submodule1 import function2, Struct2
To import all definitions, it is possible to use:
from module1 import *or simply:
import module1
But doing this is considered a bad practice: only import what you really need to use less resources. That way you also know to which module a certain function or struct belongs.
For the same reason, when using the syntax import module1, it is idiomatic to qualify the functions or structs with the module name, like this:
import memory
_ = memory.UnsafePointer(to=lst)
Or use an alias like this:
import memory as mem
_ = mem.UnsafePointer(to=lst)
You cannot import the same module more than once. If you do, you get this kind of error:
invalid redefinition of 'memset'If you have many things to import, enclose them within (), like this:
from sys.info import (
    alignof,
    sizeof,
    bitwidthof,
    simdwidthof,
    simdbitwidth,
    simdbytewidth,
)from/import statements can be written everywhere in code, but code clarity can be enhanced by grouping them at the start of a code file. Writing them in alphabetical order is also advisable when there are many import lines.
Making and importing a Mojo module
A Mojo module is just a single Mojo source file that includes code (like an API), suitable for use by other files that import it. The source file name is also the module’s name. It doesn’t need a main() function, because it is not meant to be started on its own: the program that imports the module will usually contain a main() function to start the application.
The module gets its name from the source file name, without extension. For example: a file compute.mojo contains the code for module compute. Let’s reuse a previous example, rewriting the Python module as a Mojo module compute:
fn mul(n: Int, m: Int) -> Int:
    return n * m

fn pow(n: Int, m: Int) -> Int:
    return n ** m
Now we can import this module (or part of its functionality) in a source file (see main.mojo) in the same folder which can execute:
from compute import mul, pow     #A

fn main():
    var i = 42
    var j = 7
    var res1 = mul(i, j)         #B
    var res2 = pow(i, j)         #B
    print(res1, res2)  # => 294 230539333248

#A Import functions mul and pow from compute
#B Call functions mul and pow from main.mojo
Importing the mul and pow functions from module compute and executing them in a program could not be easier. The folder structure is:
/project_folder
    main.mojo       #A
    compute.mojo    #B

#A The main program
#B The local compute module
Common file structure for a project
From Appendix A (found at the end of this article) we can learn what the most basic structure of a Mojo project is after creating it and installing the Modular environment:
/project_folder
    .pixi/          #A
    .gitattributes  #B
    .gitignore      #B
    pixi.lock       #C
    pixi.toml       #D

#A Folder with the virtual environment
#B Files needed for a GitHub project
#C Contains versions for all dependencies (auto-generated)
#D The project configuration file
The directory project_folder is also called the project root folder. pixi.toml is the project configuration file, or manifest. It is generated by the pixi tool but can be edited afterwards.
In Figure 10.1 you see an example project structure based on official documentation and community best practices.
Key points:
A Mojo project is by default a local repository, ready to be published in a GitHub repo online.
The
pixi.tomlandpixi.lockfiles are created and managed by the Pixi CLI and define your project’s dependencies and environment.The
.pixidirectory contains the virtual environment for the project.Each Mojo package is a directory with an
__init__.mojofile to signal it’s a package. Modules (e.g.,module1.mojo) live inside these package directories.You can organize Python code in a separate directory (e.g.,
py/) if your project uses both Mojo and Python.A
testsdirectory is commonly used for test files, and sometimes a link to the code directory is used to simplify imports during testing.
This structure is flexible and can be adapted to your project’s needs, but the presence of pixi.toml, .pixi, and init.mojo files in package directories is essential for proper project- and package management by Mojo and Pixi.
The project’s app starts running with main.mojo, which imports code from package1 and uses it.
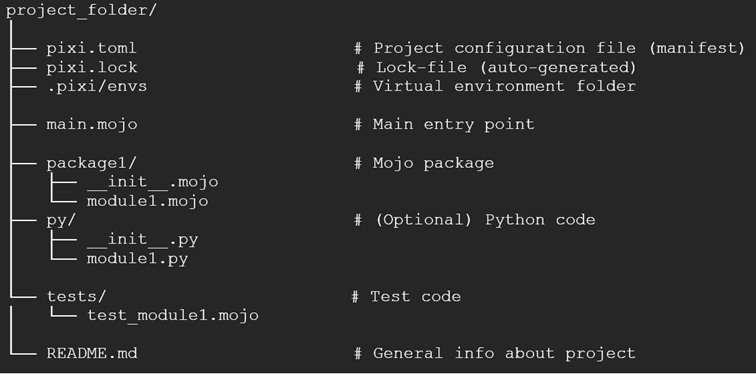
Fig. 1 – Typical project folder structure. In our example, package1 would be compute.
In general, when there are more packages than package1, they can exist parallel to each other, or all be subfolders of one folder src.
Importing a package from source files
Let’s now reorganize our project to this structure, calling it compute_project.
In our folder modules_and_packages do:
$ pixi init compute_project -c "https://conda.modular.com/max-nightly" -c "https://repo.prefix.dev/modular-community" -c "conda-forge"
✔ Created /$HOME/mojo_book/modules_and_packages/compute_project/pixi.toml
$ cd compute_project
$ pixi shell
Now the current Modular virtual environment is installed, and you can check the Mojo version with:
$ mojo -v
# => mojo 25.4.0.dev2025052116 (fb591a52)
Copy the file main.mojo to folder compute_project. In it, create a folder compute, and move compute.mojo in it. But if we now try to run the program, we get an error:
$HOME/mojo_book/modules_and_packages/compute_project/main.mojo:1:6:
error: unable to locate module 'compute'
from compute import mul, pow
     ^
The reason is that folder compute is not recognized as a package. To remedy that, it needs a (possibly empty) __init__.mojo file, so we create this. The folder structure of compute_project has now become:
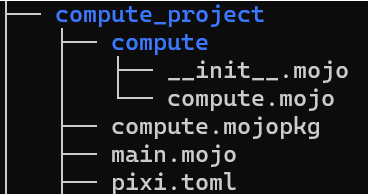
Fig. 10.2 – Folder structure of compute_project
Now the package compute is recognized, but we still get an error when trying to run:
error: package 'compute' does not contain 'mul'
from compute import mul, pow
This means Mojo doesn’t find the mul function. What’s still needed is to expose the functions from the compute module in the __init__.mojo file as follows:
from .compute import mul, powThis is called re-exporting the module’s symbols: .compute here represents the local (.) compute module. Such relative imports only work inside packages.
This makes your APIs (like mul and pow here) accessible from the package name compute.
What we have done can be called importing modules to the package scope.
Here you could decide not to expose functions or structs that are private to the modules, such as pure helper functions. The names of private functions or structs start with an _.
We finally get the correct results:
$ mojo main.mojo
# => 294 230539333248
Here the package and module are both named compute, but this could be different, especially when there are several modules in the package.
An alternative way is to leave __init__.mojo empty. Then you have to write the import in main.mojo in the qualified form package.module as:
from compute.compute import mul, powThe presence of __init__.mojo is crucial here. If you delete it, then Mojo doesn’t recognize the directory compute as a package and it cannot be imported. So, a Mojo package is a directory containing an __init__.mojo file (which can be empty). This tells Mojo to treat the directory as a package.
Nested packages (subfolders with their own __init__.mojo) can also be used, just like in Python. This allows you to organize your code hierarchically.
Instead of importing from source files, we can also make a binary package, as we’ll see now.
Importing a compiled package
A more efficient way to work with packages is to compile the package into a .mojopkg or .📦 file. That’s easier to share than a bunch of source files, while being still compatible with other system architectures. Moreover, compiling module code into binary packages will get you faster start-up and execution.
Compiling a package
Compile a package’s package1 source code into a package file with the mojo package command like this:
mojo package package1 -o package1.mojopkgpackage1.mojopkg is the name of the output binary.
In our example this would become:
mojo package compute -o compute.mojopkgThis creates the package file compute.mojopkg.
The code in a .mojopkg file is parametric bytecode, obtained by compiling Mojo source code with the JIT part of the compiler.
The filename which you specify with the mojo package command can differ from the package directory name. Be careful what you use as the package name in the from package import … statement:
When importing from source files, the directory name must be used as the package name.
When importing from a compiled package, the filename (without the
.mojopkgextension) is the package name.
To specify a new name, simply run mojo package again with the new output name. Make sure that the name of the package file and the imported name in main.mojo stay the same.
Now the user doesn’t need to have the source code on their machine anymore. The package code can be moved elsewhere (say into a folder production), and the project structure looks like this:
/production
    compute.mojopkg
    main.mojo
Executing mojo main.mojo still produces the same output.
Building the project
If you want to get rid of the binary package file as well and compile everything into one executable app, use the command:
mojo build main.mojo -o appThen ./app gives the same output as before, even when the .mojopkg file is removed.
Now your project can be distributed in only one file:
/production
    app
Test this by copying the app file in a completely different folder and execute ./app to see the same output (you probably will have to do a chmod u+x app).
Note that when building, the binary code becomes architecture specific.
Using pixi as Mojo’s package manager
Currently many external modules are being written by members of the Mojo community. The official repository for these modules is located here.
The modules published there are being reviewed and must contain a test suite to ensure their quality. You can also view the featured community packages in a more readable format here.
Whether you want to install, submit, or review packages, this forum post can get you started.
The pixi tool that we know from installing the Modular environment (see Appendix A found at the end of this article) is also used to install modules from this repo into your local environment. To follow along, make sure you’re in the modules_and_packages folder, and after typing pixi shell, you get the following prompt:
(modules_and_packages) user@computer:~/mojo_book/modules_and_packages$As an example, we will install the lightbug_http package. Execute the following steps:
Add the Modular community channel (
https://repo.prefix.dev/modular-community) to yourpixi.tomlfile in the channels section:
[project]
authors = ["Author data"]
channels = [
  "https://conda.modular.com/max-nightly",
  "https://conda.modular.com/max",
  "conda-forge",
  "https://repo.prefix.dev/modular-community",
]
name = "modules_and_packages"
platforms = ["linux-64"]
version = "0.1.0"

[tasks]

[dependencies]
max = "*"
Pixi allows you to browse for packages from the above channels by typing
pixi search light*on your command-line:
$ pixi search light*
Using channels: https://conda.modular.com/max-nightly/, https://conda.modular.com/max/, conda-forge, https://repo.prefix.dev/modular-community/
Package                                  Version             Channel
lightly                                  1.5.20              conda-forge/noarch
lightfm                                  1.17                conda-forge/linux-64
…
lightbug_http                            0.1.19              https://repo.prefix.dev/modular-community//linux-64
…
To install the chosen package, enter the following command:
$ pixi add lightbug_http
V Added lightbug_http >=0.1.19,<0.2
Verify with the pixi list command that the package is installed locally in your project.
From here you can import any functionality you need from the package with import statements as previously discussed, for example:
from lightbug_http.service import HTTPServiceAppendix A
Setting up a development environment
Follow the steps below and you’ll start coding with Mojo in no time.
The Mojo tools are completely free forever and will eventually be open-sourced.
NOTE
Currently, the Mojo toolchain works on Linux (Ubuntu and other distros) and on macOS (Apple Silicon). On Windows, everything works fine within the WSL2 environment. Native support for Apple (Intel) and Windows is coming.
A.1 Installing Pixi
Installing Mojo locally is a quick and easy process. We only need to get pixi and the modular package.
Use the following command from a terminal if pixi doesn’t exist yet on your machine:
$ curl -fsSL https://pixi.sh/install.sh | shNow the pixi binary is in the folder $HOME/.pixi/bin, where $HOME equals /home/username or ~, and the command is system-wide available.
Test it by showing its version:
$ pixi -VOutput, for example:
pixi 0.48.0If you need to get the latest version, do:
$ pixi self-updateRemoving pixi is as easy as:
$ rm ~/.pixi/bin$ pixi -h shows all available commands.
NOTE:
If you’re working in a newly created Linux/macOS or WSL environment, make sure to install:$ sudo apt-get install -y git gcc g++ zlib1g-dev libtinfo-dev
What is Pixi?
Pixi is a virtual environment manager and works also as package manager for Mojo, Python, and other languages, kind of like what cargo is for Rust developers.
Why use a virtual environment?
Pixi allows you to create fully contained projects in a so-called virtual environment (venv), which is a separate environment (in a folder) which contains the exact versions of all packages you need.
In a venv, the package dependencies and environment settings are automatically managed for you. In fact, any Mojo project is created in a virtual environment. What is the advantage of working with this? In the global (machine-wide) environment, you can have only one version of a package installed, say numpy v 2.0. Suppose you need to maintain a project which uses numpy v 1.8. This cannot work globally, so you have to create a closed virtual environment containing numpy 1.8, in which you can maintain your project. This venv can contain particular versions of Mojo and of any package your project needs. Now you can work on your project without any conflicts with the global environment or any other virtual environments you create.
Let’s illustrate this more concretely by creating a Mojo project.
A.2 Creating a Mojo project
To keep all your Mojo projects in one place, you probably want to create a folder (any name will do) like mojo_projects, and cd into it.
The following command creates a Mojo project named project1 with pixi init:
$ pixi init project1 -c "https://conda.modular.com/max-nightly" -c "https://repo.prefix.dev/modular-community" -c "conda-forge"This displays the following output:
Created $HOME/mojo_projects/project1/pixi.tomlA folder project1 is created, git version control-ready (cd into it and check with $ ls -al). It contains the configuration file (also called the manifest) pixi.toml, which contains:
[workspace]
authors = ["Username <email-adress>"]
channels = ["https://conda.modular.com/max-nightly", "https://repo.prefix.dev/modular-community", "conda-forge"]
name = "project1"
platforms = ["linux-64"]
version = "0.1.0"

[tasks]

[dependencies]
The channels field in [workspace] contains all locations where pixi can find and download the files that are necessary to run your Mojo code.
In the [tasks] section, you can define different tasks to be executed for your project, like testing. The [dependencies] section names the versions of all packages your code depends on.
Note
In thepixi initcommand we used the channel"https://conda.modular.com/max-nightly". This gives you the nightly update of the Modular package and Mojo compiler, containing the latest new features and performance improvements. If you want to stay in sync with the rapid development of Mojo, this is ok. Be warned that this version can be unstable, and changes very frequently, so this is not to be used for a project in production!
On the other hand, if you want to stay synchronized with a stable version of Mojo, say v. 25.4, you should use the channel"https://conda.modular.com/max"instead.
With this setup, Mojo works only inside the directory created with pixi init, which is great for project development. If you want the latest stable Mojo to be system-wide available, you can install it globally with:
$ pixi global install max -c conda-forge -c https://conda.modular.com/max/ --expose mojoIf you want to create a pixi project in an existing folder, just go into that folder and issue the previous command, leaving out the project name project1.
Installing the Modular platform
This can be done in two ways:
Execute the command:
$ pixi add modularThis downloads and installs the modular package in your folder. When it is finished, it displays:
✔ Added modular >=25.4.0.dev2025060721,<26Check that this dependency was added to the pixi.toml file!
The MAX engine, which is registered as a conda project, is now installed. Mojo is bundled together with MAX, so it is available as well!
The command also has added the following:
A
.pixisubfolder, which contains the complete virtual environment for your Mojo project in the folderenvs.A
pixi.lockfile
This big file contains in detail all dependencies, namely the exact versions and the dependencies of the dependencies (the transitive dependencies). This ensures that you get the exact same environment when building your project on another machine.
If you’re curious, look inside it with the grep command: grep -R 'word' pixi.lock, for example: grep -R max pixi.lock.
Do not edit/change it, because this is an auto-generated file!
Let’s verify the Mojo version we have installed in our project environment with the following command (pixi run executes a command in the venv):
$ pixi run mojo --versionThis should display something like:
Mojo 25.4.0.dev2025060721 (b35d3649)Where devnnn denotes the latest Mojo nightly file.
Another way to install the platform is by editing the
pixi.tomlfile, and adding a line to the[dependencies]section of the format"package = version", in our case:
max = "*"The max package contains the mojo package, so this gets us Mojo as well. "*" means: get the latest (nightly) version.
The version could also be indicated as:
"==25.4": which gets you that exact version.">=25.4": meaning, install the latest version in “any version from 25.4” or later.">=25.2, <25.4": meaning, install version 25.2 or later, but less than 25.4."~=25.4": this adds a version of Max and Mojo, namely v25 and compatible versions.
When this info is saved, run the following command in a terminal:
$ pixi installBoth ways will add this dependency info also to the pixi.lock file.
NOTE:
In a future version, the subfolder.pixiwill contain all dependencies not physically as it does now, but as links. Only one copy of every version of every dependency is kept on your machine in a system cache, and each project only links to the copies it needs.
A.3 Working with the pixi shell
You can run a Mojo program outside the pixi shell with:
$ pixi run mojo hello_world.mojoBut it is much easier to work inside the shell using simpler commands. To enter this shell do:
$ pixi shellThis will show you a new prompt, which starts with your project name, like:
(project1) username$computername: folder-path$Now you can work with any mojo command. For example, check the version of Mojo and MAX with:
$ mojo -vmojo 24.6.0 (4487cd6e)Use exit to leave the pixi shell to the OS prompt.
Some other useful Pixi commands
Here are some of the most used commands:
1) Add a dependency
This is done through the add command. For example, to add a specific Python version to your Mojo project you can use:
$ pixi add "python==3.10"Try it out and examine the change in the .toml configuration file.
Use the same command to add one (or more) Python packages:
$ pixi add "python==3.10" "numpy<2.0"This adds python v 3.10 and the latest version of NumPy that’s less than 2.0.
An alternative way is to add these dependencies to pixi.toml as:
python==3.10
numpy<2.0
and then run pixi install again.
If the package is not available in conda-forge, you must add its channel to the channels list in pixi.toml.
2) Update a dependency
Use the pixi update packagename command, for example:
$ pixi update max3) Clean the local project environment
The command pixi clean will delete the current environment, without affecting the manifest .toml file.pixi install then installs the latest versions. The neat effect is to remove any outdated dependencies. This avoids clutter and keeps your project running fluently.
4) Starting from a Python project
Add the desired Python version to the project folder with:
$ pixi add "python==3.12"How would you add Mojo to such a project?
Run:
$ pixi add maxFor more details on what Pixi can do, see chapter 10 and the official documentation (https://pixi.sh/latest/getting_started/).
You can also install the Modular software as a Python package in a Python environment with:
$ pip install modular(https://docs.modular.com/max/get-started/)
A.4 Installing Visual Studio Code, the Mojo extension and Jupyter notebooks
Plugins exist for the vim and PyCharm editors, but the most popular development platform for Mojo is Visual Studio Code (VS Code) (
https://code.visualstudio.com/
). Installing this is straightforward. It works on every OS; notably, the Windows integration with WSL2 is superb.
Then install the official plugin (developed and maintained by the Modular team) called vscode-mojo from:
https://marketplace.visualstudio.com/items?itemName=modular-mojotools.vscode-mojo
or search for “Mojo” in the “Extensions: Marketplace” tab.
Together with its integrated LSP (Language Server), it gives you a ton of functionalities.
Note
Two versions of the extension exist: Mojo and Mojo (nightly). The first one is the stable version. Synchronize this with the version you use in your Mojo projects.
We’ll start using it in § 1.4.2.
The Mojo LSP server can also be used in other editors that support LSP.
To work with Jupyter notebooks in VS Code, you need to install the Jupyter VS Code extension from:
https://marketplace.visualstudio.com/items?itemName=ms-toolsai.jupyter
Here are the steps to install Jupyter notebook in a project:
Within your pixi shell, add Python with, for example:
$ pixi add "python==3.12"Then run the command:
$ pip install notebookFor Mojo you need to install the following libraries:
$ pixi add ipykernel jupyterlabA.5 Moving from magic to Pixi
In an existing magic project:
do
magic cleandelete the
.magicfolder andmagic.lockrename
mojoproject.tomltopixi.tomldo
pixi install
A.6 Where to find more information
For more information, you can access the GitHub repository for Mojo and Max or the official docs.
You can also contact other Mojo users or the Modular team on the Discord channel or on the Forum. Discord even has an AI-chatbot specialized in Mojo code to answer your queries or problems. Just type @kap and choose the value @kapa.ai from the list, then state your question after that (see the channel mojo-bot-help).
A Reddit channel and a community website are also available. For broader info, you can consult Modular’s website.
The MAX Builds page is also live and contains examples of implemented AI models, recipes, and top community packages, which you can view here. Their official repo is maintained here.
An overview of educational material and links to community projects can be found here.
Info about local installation:
The pixi executable is stored centrally at: $HOME/.pixi/bin
Currently (June 2025) a project’s dependencies are still physically contained in the .pixi folder of every project (more precisely in $HOME/projectname/.pixi/envs/default/):
The mojo cache and
modular.cfgfile is stored in the subfoldershare/max.The
mojo,mojo-lldb, andmojo-lsp-serverexecutables are stored in thebinsubfolder.The Mojo/Max packages are stored at the
lib/mojosubfolder.
© 2026 Ivo Balbaert. All rights reserved.